Are you tired of manually building, testing, and deploying your applications?
Modern Continuous Integration (CI) and Continuous Deployment (CD) approaches can automatically trigger a deployment pipeline to build your Docker image, run tests, push it to a container registry like GHCR or Docker Hub, and deploy it to your server.
The best part is that you can complete all of this in less than a minute after pushing code to your GitHub repository.
By combining Docker with the automation capabilities of GitHub Actions, you can create a fast and effective DevOps pipeline. Docker ensures your application runs the same way everywhere by packaging it with its dependencies in a portable Docker container based on instructions in your Dockerfile. GitHub Actions then automates the build and push steps, securely manages secrets like access tokens, and handles the final deployment to your infrastructure.
In this guide, we’ll walk you through configuring your GitHub Actions workflow step-by-step, from publishing a container to deploying it on your server without third-party tools or subscriptions.
By the end of this tutorial, you will be able to configure a deployment pipeline that updates your live server in under a minute after you push changes to it.
Let’s get started!
What are GitHub Actions?
GitHub Actions is a powerful automation tool built directly into the GitHub platform. It listens for specific events happening in your repository, like someone pushing new code, creating a pull request, or even on a set schedule, and then automatically performs tasks you’ve defined. These tasks form a workflow, which is essentially a sequence of steps designed to achieve a specific goal. You can use this functionality to create a Continuous Integration (CI) and Continuous Deployment (CD) pipeline.
This means you can automate the entire process of building your software, running tests to ensure quality, and even deploying it to servers (perhaps managed through tools such as RunCloud) without manual intervention.
Key Features of GitHub Actions
GitHub Actions has several useful features that make it a compelling choice for automation. Firstly, its event-driven nature allows workflows to trigger automatically in response to a wide variety of GitHub events. Secondly, matrix builds let you efficiently test your code across different environments simultaneously; you can define combinations of operating systems (like Linux, macOS, and Windows), software versions (like different Node.js or Python versions), or other variables, and GitHub Actions will run a job for each combination.
Furthermore, GitHub provides hosted runners, which are virtual machines managed by GitHub that can execute your workflow jobs without requiring you to manage any infrastructure. If you have very specific needs, then you can also consider using self-hosted runners on your own servers or cloud infrastructure.
All the actions and workflows on GitHub can be reused. You can even configure pre-built steps created by the community (available in the GitHub Marketplace) and save significant development time. Lastly, GitHub Actions includes integrated secrets management for securely handling sensitive information like API keys and passwords. It provides live logs for monitoring workflow progress in real time and the ability to store artifacts like build outputs or test reports.
📖 Suggested read: What is Docker And How Does it Work
Steps to Deploy Docker Container with GitHub Actions for CI/CD
Let’s walk through the steps to automate building your application’s Docker image, pushing it to a registry, and then deploying it to your server every time you push changes to your repository.
Prerequisites:
- GitHub Repository: You need a GitHub repository containing all your application code. Make sure you have committed and pushed your latest code changes to GitHub.
- Dockerfile: You must have a Dockerfile in the root of your repository. This file contains the step-by-step instructions Docker uses to build an image of your application. The specific commands inside the Dockerfile depend heavily on your application’s language, framework, and dependencies (e.g., installing packages, copying code, setting entry points), so we assume you have already created a functional Dockerfile.
Step 1: Connect to Linux Server via SSH
First, ensure you can connect to the target Linux server where your Docker container will run. You’ll need SSH access for this.
ssh your_server_user@your_server_ipIn the above command, replace your_server_user with your username and your_server_ip with the server’s IP address. If you manage your server with RunCloud, you can use the simplified SSH key management to store SSH keys. We recommend reading the RunCloud documentation to learn how to easily create and manage SSH keys for secure server access.
📖 Suggested read: What Are Docker Images And How To Use Them
Step 2: Verify Docker Installation on the Server
Once connected to your server via SSH, you need to confirm that Docker is installed and running correctly. The Docker Command Line Interface (CLI) is required to pull images and run containers. You can test this by running the standard Docker test image:
docker run hello-worldIf Docker is installed and working, you will see a message starting with “Hello from Docker!”. This message indicates that your installation appears to be working correctly.
If the command fails or Docker is not found, you must install Docker Engine on your Linux server before proceeding. Follow the official Docker installation documentation specific to your server’s Linux distribution (e.g., Ubuntu, RHEL).
📖 Suggested read: How To Create a Docker Image For Your Application
Step 3: Add GitHub Action Secrets for SSH Access
To allow your GitHub Actions workflow to securely log in to your server and execute deployment commands, you must store your server’s connection details as encrypted secrets in your GitHub repository. You should never hardcode sensitive information directly into your workflow file – we recommend using GitHub’s built-in secret management system for this.
Navigate to your GitHub repository > Settings > Secrets and variables > Actions. Click “New repository secret” for each of the following:
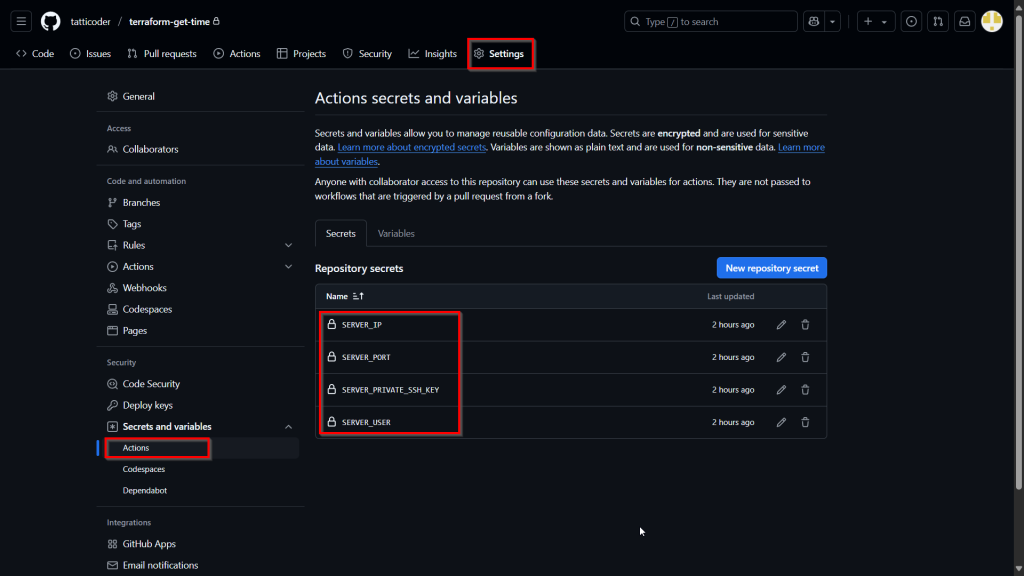
- SERVER_IP: The public IP address of your Linux server.
- SERVER_PORT: The SSH port for your server (usually 22, but might be different if customized).
- SERVER_USER: The username you use to log in to your server via SSH. We strongly recommend creating a new user account specifically for this deployment step and giving it appropriate permissions for better security.
- SERVER_PRIVATE_SSH_KEY: The entire content of the private SSH key file that corresponds to a public key authorized on your server. Your private SSH key should look something like this:
-----BEGIN OPENSSH PRIVATE KEY-----
b3BlbnNzaC1rZXktdjEAAAAABG5vbmUAAAAEbm9uZQAAAAAAAAABAAABlwAAAAdzc2gtcn
...
UV7ErwUhELMZFrAAAAE3RhdHRpY29kZXJAc3Rhcmx1c3QBAgMEBQYH
-----END OPENSSH PRIVATE KEY-----
Using secrets prevents exposing your server credentials in your codebase. The workflow will reference these secrets securely during execution. We strongly recommend creating a dedicated SSH key pair specifically for automation.
Again, consulting the RunCloud documentation can be very helpful in generating and managing SSH keys securely, especially regarding best practices for SSH security.
📖 Suggested read: Understanding Docker Services | RunCloud Docs
Step 4: Configure GitHub Actions Workflow
Now, define the CI/CD pipeline using a GitHub Actions workflow file. This file tells GitHub what steps to perform when triggered (e.g., on a push to your main branch).
Create a YAML file named docker-publish.yml inside your repository’s .github/workflows/ directory. You can create this directory and file directly via the GitHub web interface or in your local repository using a text editor, and then commit and push the changes.
Paste the following code into .github/workflows/docker-publish.yml:
name: Publish & Deploy Docker container

# This workflow uses actions that are not certified by GitHub.
# They are provided by a third-party and are governed by
# separate terms of service, privacy policy, and support
# documentation.


on:
  push:
    # Adjust branch name if needed (e.g., master, production)
    branches: [ "main" ]
    # Publish semver tags as releases.
    tags: [ 'v*.*.*' ]
env:
  # Use docker.io for Docker Hub if empty
  REGISTRY: ghcr.io
  # github.repository as <account>/<repo>
  IMAGE_NAME: ${{ github.repository }}
jobs:
  build:
    runs-on: ubuntu-latest
    permissions:
      contents: read
      packages: write
      # This is used to complete the identity challenge
      # with sigstore/fulcio when running outside of PRs.
      id-token: write


    steps:
      - name: Checkout repository
        uses: actions/checkout@v4


      # Install the cosign tool except on PR
      # https://github.com/sigstore/cosign-installer
      - name: Install cosign
        if: github.event_name != 'pull_request'
        uses: sigstore/cosign-installer@59acb6260d9c0ba8f4a2f9d9b48431a222b68e20 #v3.5.0
        with:
          cosign-release: 'v2.2.4'


      # Set up BuildKit Docker container builder to be able to build
      # multi-platform images and export cache
      # https://github.com/docker/setup-buildx-action
      - name: Set up Docker Buildx
        uses: docker/setup-buildx-action@f95db51fddba0c2d1ec667646a06c2ce06100226 # v3.0.0


      # Login against a Docker registry except on PR
      # https://github.com/docker/login-action
      - name: Log into registry ${{ env.REGISTRY }}
        if: github.event_name != 'pull_request'
        uses: docker/login-action@343f7c4344506bcbf9b4de18042ae17996df046d # v3.0.0
        with:
          registry: ${{ env.REGISTRY }}
          username: ${{ github.actor }}
          password: ${{ secrets.GITHUB_TOKEN }}


      # Extract metadata (tags, labels) for Docker
      # https://github.com/docker/metadata-action
      - name: Extract Docker metadata
        id: meta
        uses: docker/metadata-action@96383f45573cb7f253c731d3b3ab81c87ef81934 # v5.0.0
        with:
          images: ${{ env.REGISTRY }}/${{ env.IMAGE_NAME }}


      # Build and push Docker image with Buildx (don't push on PR)
      # https://github.com/docker/build-push-action
      - name: Build and push Docker image
        id: build-and-push
        uses: docker/build-push-action@0565240e2d4ab88bba5387d719585280857ece09 # v5.0.0
        with:
          context: .
          push: ${{ github.event_name != 'pull_request' }}
          tags: ${{ steps.meta.outputs.tags }}
          labels: ${{ steps.meta.outputs.labels }}
          cache-from: type=gha
          cache-to: type=gha,mode=max


      # Sign the resulting Docker image digest except on PRs.
      # This will only write to the public Rekor transparency log when the Docker
      # repository is public to avoid leaking data.  If you would like to publish
      # transparency data even for private images, pass --force to cosign below.
      # https://github.com/sigstore/cosign
      - name: Sign the published Docker image
        if: ${{ github.event_name != 'pull_request' }}
        env:
          # https://docs.github.com/en/actions/security-guides/security-hardening-for-github-actions#using-an-intermediate-environment-variable
          TAGS: ${{ steps.meta.outputs.tags }}
          DIGEST: ${{ steps.build-and-push.outputs.digest }}
        # This step uses the identity token to provision an ephemeral certificate
        # against the sigstore community Fulcio instance.
        run: echo "${TAGS}" | xargs -I {} cosign sign --yes {}@${DIGEST}


  deploy:
    needs: build
    runs-on: ubuntu-latest
    steps:
      - name: SSH and Deploy to Server
        uses: appleboy/ssh-action@v1
        with:
          host: ${{ secrets.SERVER_IP }}
          username: ${{ secrets.SERVER_USER }}
          key: ${{ secrets.SERVER_PRIVATE_SSH_KEY }}
          port: ${{ secrets.SERVER_PORT }}
          script: |
            echo ${{ secrets.GITHUB_TOKEN }} | docker login ${{ env.REGISTRY }} -u ${{ github.actor }} --password-stdin
            echo "--- Pulling latest Docker image ---"
            docker pull ghcr.io/tatticoder/terraform-get-time:main
            echo "--- Stopping existing container (if running) ---"
            docker stop my_container
            echo "--- Removing existing container ---"
            docker rm my_container
            echo "--- Starting new container ---"
           # Adjust ports (-p host:container)
           # Add any necessary environment variables (-e)
            docker run -d --name my_container -p 3000:80 ghcr.io/tatticoder/terraform-get-time:main
Let’s understand the important sections of the above code snippet:
- name: Sets the display name for your workflow in the GitHub Actions tab.
- on: push: branches: [ main ]: This triggers the workflow every time code is pushed to the main branch. You can change main to your default or production branch name (e.g., master).
- Build Job: This section handles the process of creating and publishing the Docker container.
- Checkout code: Uses the standard actions/checkout action to get your repository code onto the runner.
- Log in to GHCR: Uses docker/login-action to authenticate with GitHub Container Registry using the automatically generated GITHUB_TOKEN.
- Build and push: Uses docker/build-push-action.
- Deploy via SSH Job: This job uses the popular SSH Remote Commands action to connect to your server using the secrets you configured and execute commands.
⚠️ Warning: The deployment script uses docker stop and docker rm before docker run. This means there will be a brief moment of downtime while the container is replaced. For zero-downtime deployments, more advanced strategies like blue-green deployments or using orchestration tools like Kubernetes are needed, which are beyond this basic setup.
To minimize the impact of downtime, you can consider deploying once a day on weekdays outside of peak hours. This schedule can be configured easily using the GitHub action itself.
📖 Suggested read: Docker Security: Best Practices to Secure a Docker Container
Step 5: Commit Workflow and Trigger Deployment
Finally, save the docker-publish.yml file. If you created it locally, commit it and push it to your GitHub repository using the following commands:
git add .github/workflows/docker-publish.yml
git commit -m "Add GitHub Actions workflow for Docker build and deploy"
git push 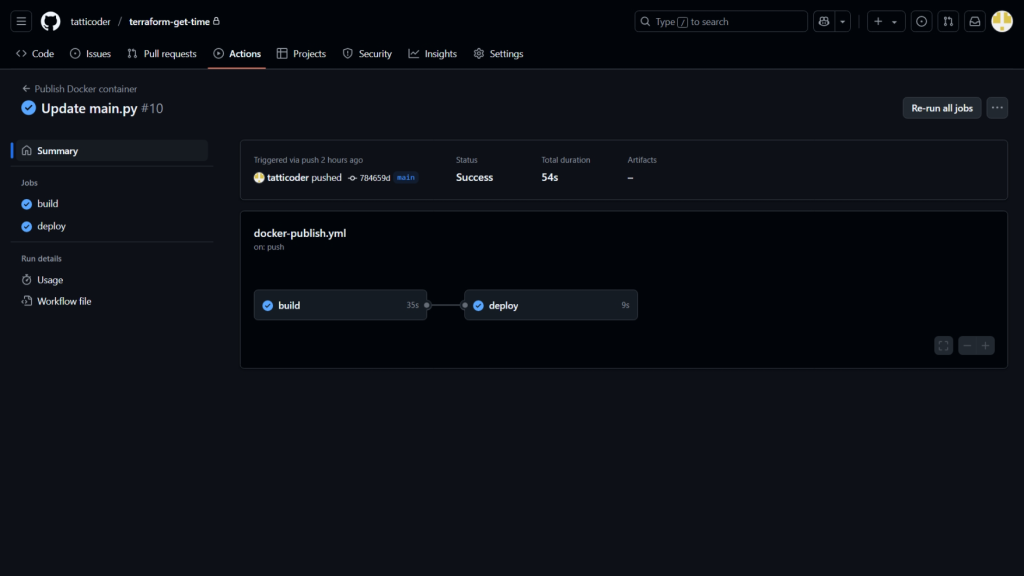
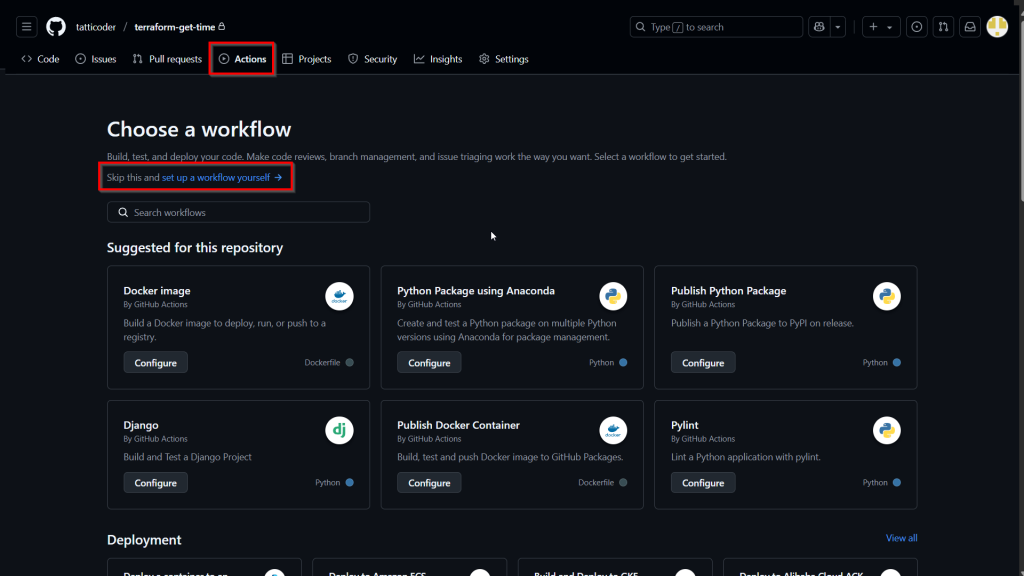
Once you push this commit (or any future code changes) to the specified branch (main in this example), GitHub Actions will automatically detect the workflow file and start executing the defined steps.
You can monitor the progress by going to the “Actions” tab in your GitHub repository. If all steps succeed, your code will be built into a Docker image, pushed to GHCR, and then pulled and run as a container on your designated Linux server.
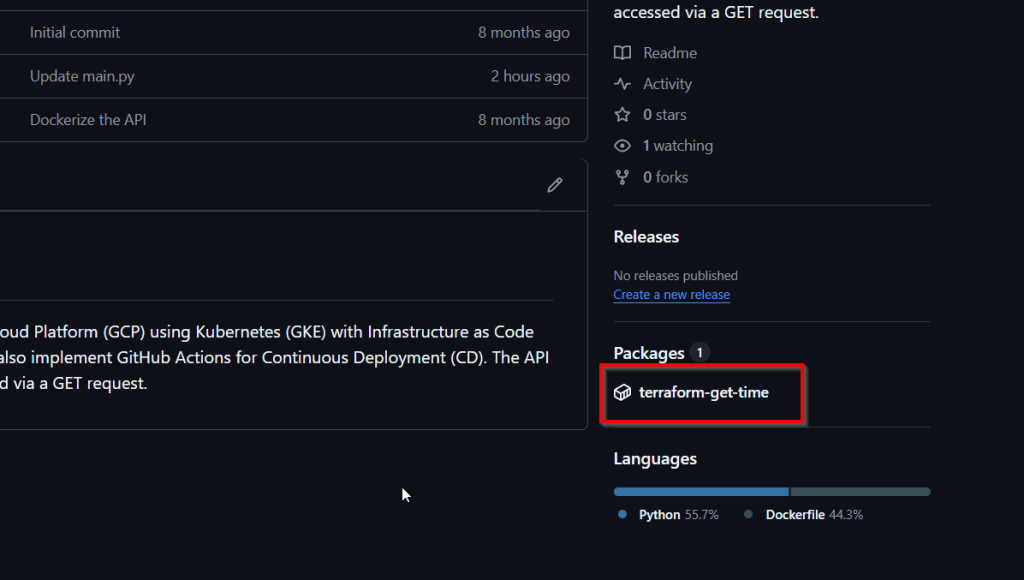
Once you have published your Dockerfile to GHCR, you will see a new tab in the bottom right of your GitHub dashboard. You can click on the name of your package to view your recently published packages.
Step 6: Remove Unused Docker Resources (Optional)
When you use a CI/CD pipeline, you will quickly end up with a large number of old obsolete containers on your server. These containers are often not needed and can slowly fill your disk space. If you are running low on disk space, then you can add an optional cleanup step to your deployment script to prevent your server’s disk space from filling up with old, unused Docker images, containers, and ‘build cache’.
The following command will automatically remove any Docker resources (like stopped containers and images not associated with a running container) that haven’t been used in the last 24 hours without requiring confirmation. Running this periodically helps maintain server health and efficiently reclaim storage:
docker system prune --filter "until=24h" --forceIf your deployment process takes a long time, consider optimizing the build stage of your container by using a caching layer within Docker to cache dependencies.
Wrapping Up: Who Should Use Docker with GitHub Actions for CI/CD?
Whether you’re a solo developer or part of a large team, automating builds and deployments saves invaluable time and reduces the potential for human error inherent in manual processes.
While GitHub Actions handles the automation of building your Docker images and triggering deployment scripts, manually configuring, securing, monitoring, and updating servers can be complex and time-consuming.
RunCloud provides a clean, efficient way to manage servers without the usual hassle. From provisioning and security hardening to database setup and app deployment, it streamlines the tasks that slow developers down. You stay in control of your infrastructure, but without getting buried in configuration files or command-line firefighting.
That means more time building, testing, and shipping better software.
Ready to take the work out of server management? Start with RunCloud today.
FAQs on Docker with GitHub Actions for CI/CD
What are the advantages of using Docker for CI/CD?
Docker ensures consistent environments from development through production. It provides process isolation and ensures that builds and tests don’t interfere with each other or the host system dependencies.
How do I secure my Docker images in GitHub Actions?
Start by scanning your images for vulnerabilities using container scanning tools directly within your GitHub Actions workflow. To reduce the attack surface, use minimal, trusted base images and avoid installing unnecessary packages. Always configure containers to run as non-root users and manage secrets securely using GitHub Secrets, never embedding them in the image layers.
Can I use Docker Compose with GitHub Actions?
Yes, Docker Compose can be effectively used within GitHub Actions workflows to manage multi-container setups. You simply need to ensure Docker Compose is installed on the runner, then use standard docker-compose commands to build images or spin up services like databases for integration testing.
What is the best way to manage secrets in GitHub Actions?
The most secure and recommended method is using GitHub Actions encrypted secrets, which are configured at the repository or organization level. These secrets can then be safely accessed within your workflow as environment variables or passed to specific actions needing credentials. Never hardcode sensitive information directly in your workflow files or application code checked into version control.
Is Docker necessary for CI/CD?
While not strictly mandatory, Docker offers substantial benefits that make it a highly popular choice for modern CI/CD pipelines. While alternative options are available, Docker provides reproducible and isolated build/test environments that are useful for reliable continuous integration and delivery.
How does Docker improve CI/CD pipelines?
Docker drastically improves CI/CD pipelines by guaranteeing environment consistency across all stages, from developer laptops to production servers. Its containerization isolates dependencies, preventing conflicts and simplifying the configuration of build agents.
Can I use self-hosted runners with Docker in GitHub Actions?
You can absolutely use self-hosted runners with Docker in GitHub Actions. This approach gives you complete control over the build environment and resources.
What is the difference between Docker and Kubernetes for CI/CD?
Docker is primarily used within the CI/CD pipeline to build application images, run tests in isolated containerized environments, and consistently package dependencies. Kubernetes is a container orchestrator typically acting as the deployment target after the CI pipeline, responsible for managing the runtime, scaling, and health of containers in a cluster. Docker creates the portable application packages used in CI, while Kubernetes manages fleets of those packages in production or staging environments (CD).